By Jenny Hubball and Bethany Turner
During any examination in an OSCE it is important to understand the pathology and thinking behind each of the signs and symptoms elicited, even if the patient being examined is ‘normal’. This article will explain each of the key findings mentioned in the cardiovascular OSCE examination video, showing you what signs to look out for and what conditions these may indicate.
Introduction
Introduce yourself to the patient and ensure to mention your grade e.g. 3rd year medical student/junior doctor/consultant.
Confirm the patient’s details taking 3 points of identification usually; Full name, Date of birth and NHS/Hospital number.
Obtain consent for the examination ensuring to explain what the examination will entail.
Position the patient appropriately at 45o on the bed.
Expose the patient’s chest appropriately (this can be done after examining the patient’s hands, arms, face and neck).
General Inspection
When assessing the colour of the patient, it is important to look for any signs of cyanosis or anaemia. A cyanotic patient would have a bluish tinge to their skin due to a lack of oxygen, whilst a patient with severe anaemia could appear pale, due to a lack of haemoglobin which usually gives blood (and therefore the skin) it’s pink colour. It is also important to assess how comfortable and aware (conscious) a patient is. If the patient has an acutely lowered conscious level or is in extreme pain call for help.
Hand Examination
When examining the dorsum of the hands, the patient may present with tendinous xanthoma. This is caused by an accumulation of lipids as large foam cells within the skin over the tendons, resulting in raised, yellowish nodules. This can be caused by familial hyperlipidaemia.
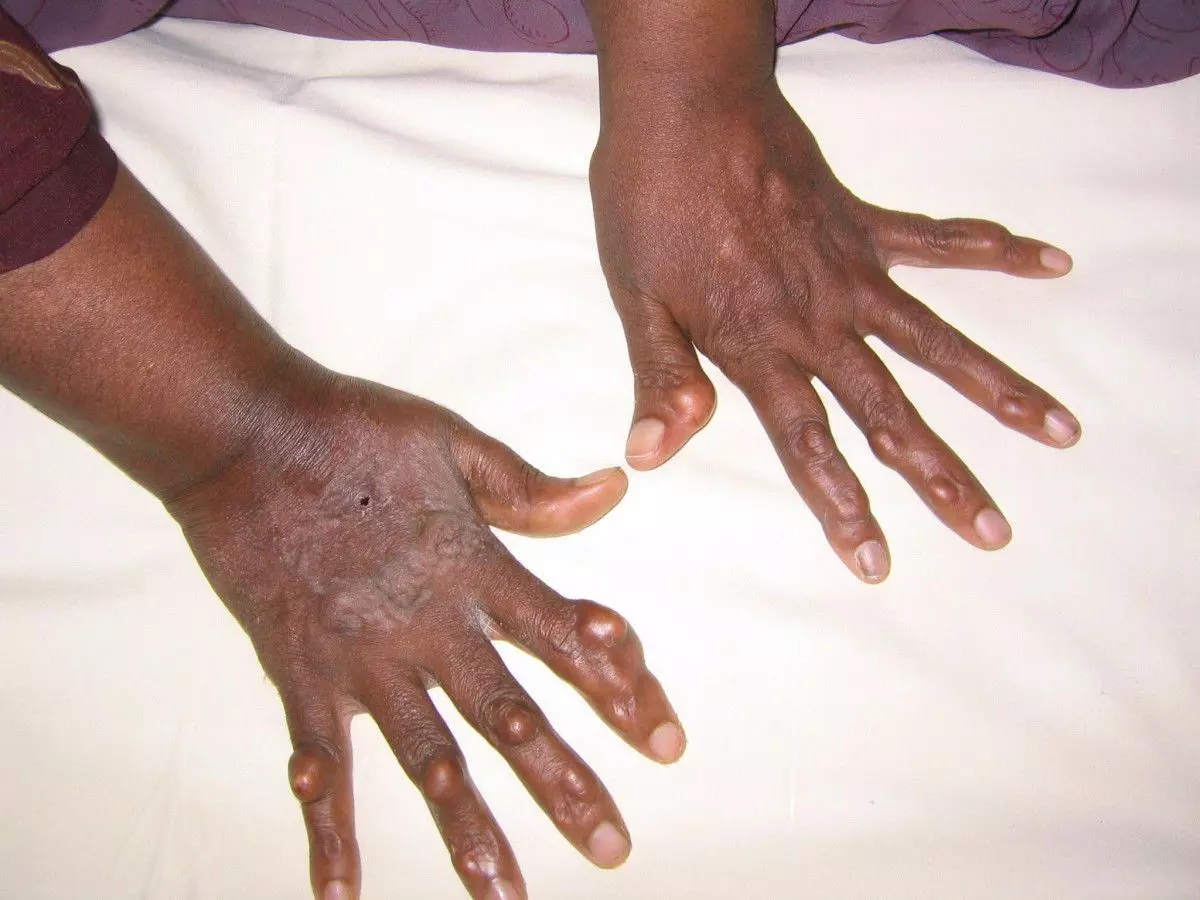
Image - Tendinous xanthoma affecting multiple digits of both hands
Creative commons source by Kumar et al. (2008) [CC BY-SA 4.0 (https://creativecommons.org/licenses/by-sa/4.0)]
When examining the nails, look for signs of splinter haemorrhages and koilonychia. Splinter haemorrhages are tiny blood clots under the nail bed. These can be caused by infective endocarditis. This is caused by the vegetation on the heart valve fragmenting into tiny microemboli which are then visible if they lodge under the nail.
Koilonychia, also known as spoon nails, is when the nails appear to curve in a concave way. This is most commonly associated with iron deficiency anaemia. It is unclear why this sign occurs.
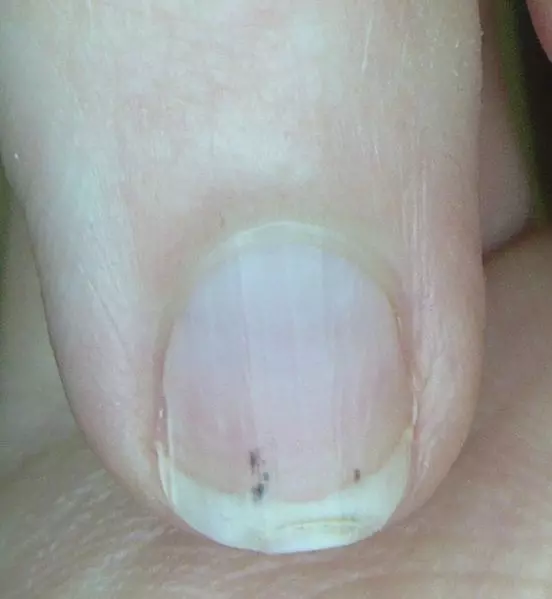
Image - Splinter haemorrhages under the nails. This is a sign of infective endocarditis due to small blood clots which have embolised to under the nails
Public Domain Source Splarka [Public domain]
On the palms of the hands there may be Janeway lesions or Osler’s nodes, both of which are also signs of infective endocarditis (along with the splinter haemorrhaging). They are both non-tender, erythematous lesions on the palms that are often indistinguishable from each other. They are caused by septic emboli from the bacterial endocarditis depositing bacteria in the skin which form microabscesses.
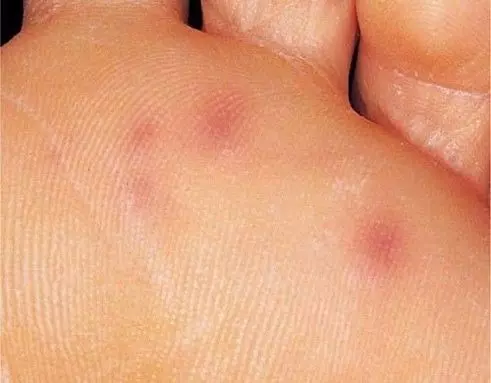
Image - Janeway Lesions on the sole of the foot. This is a sign of infective endocarditis due to the deposition of bacteria in the small capillaries of the hands
Creative commons source by DeNanneke [CC BY-SA 4.0 (https://creativecommons.org/licenses/by-sa/4.0)]
The fingers may show signs of peripheral cyanosis, which would be seen as a bluish tinge to the fingertips. Peripheral cyanosis is due to the inability of the body to perfuse the extremities. This can be caused by, low blood pressure, hypothermia or heart failure.
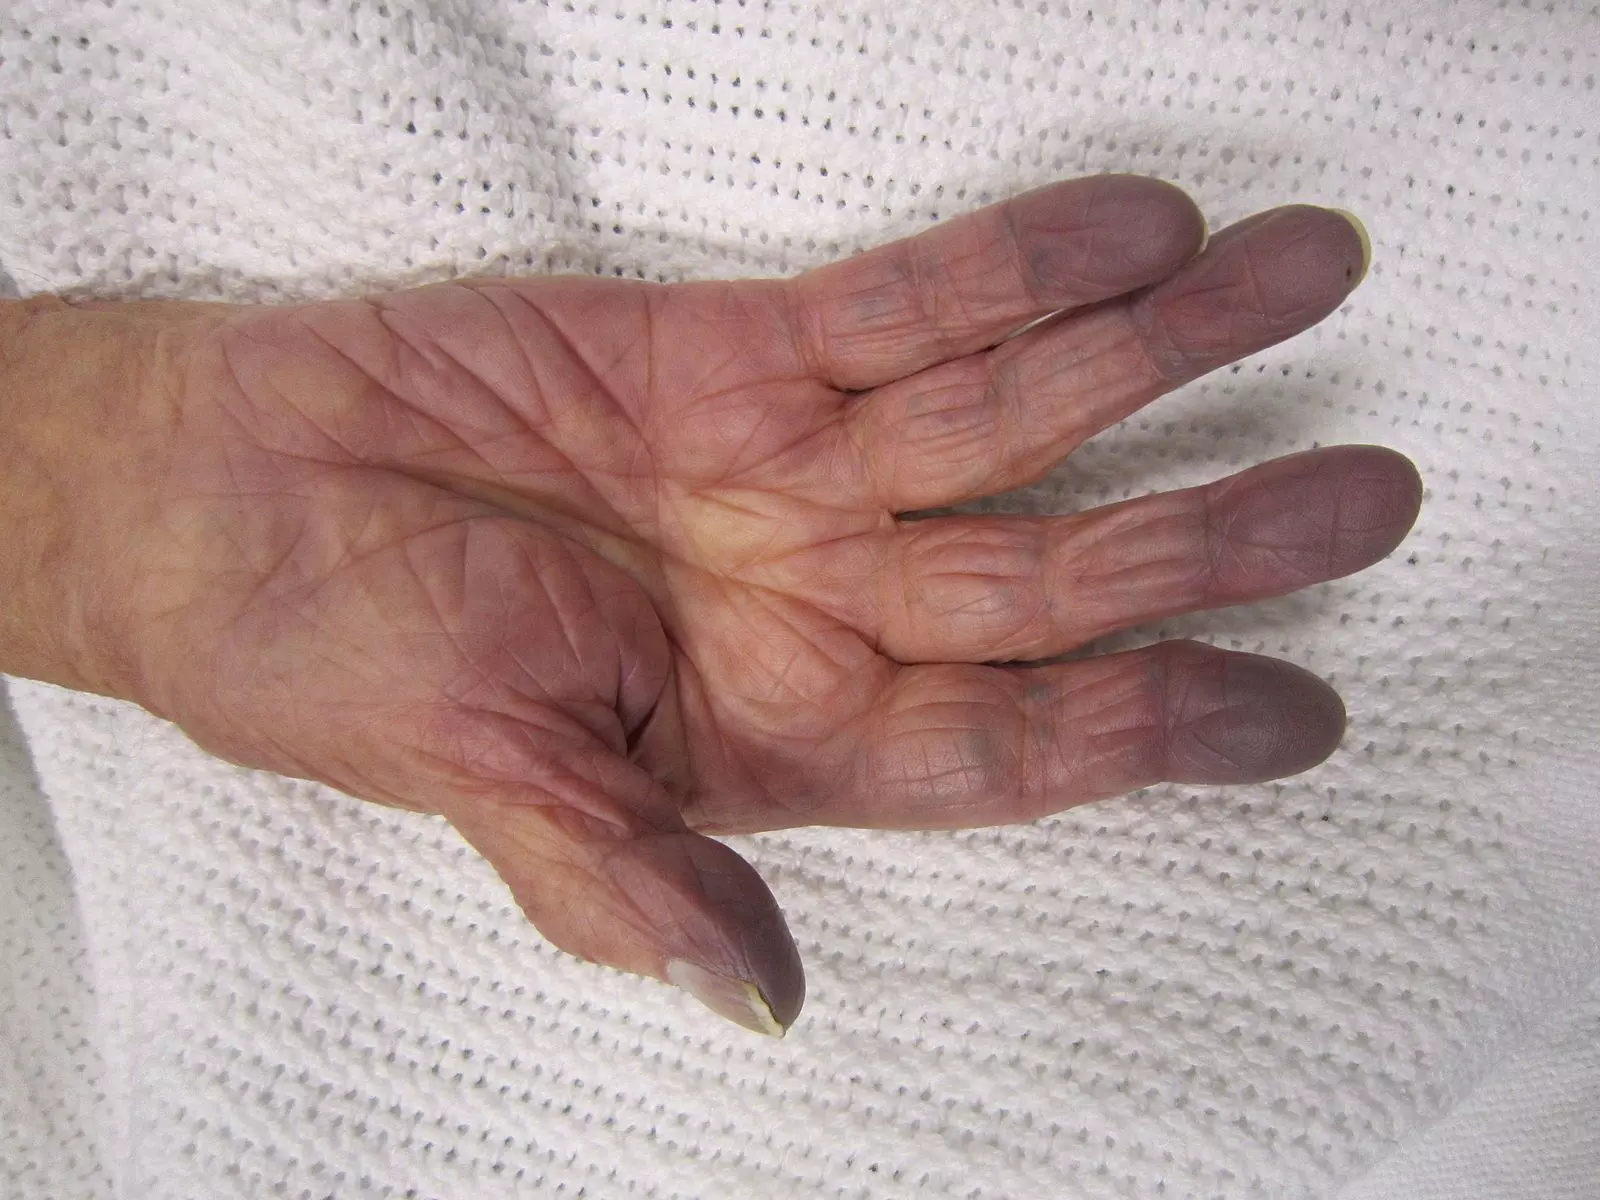
Image - Peripheral cyanosis in the hands. This is due to the fingertips not being adequately perfused
Creative commons source by James Heilman, MD [CC BY-SA 4.0 (https://creativecommons.org/licenses/by-sa/4.0)]
Finger clubbing is diagnosed using the Schamroth’s test (demonstrated in the video), and is a sign of a variety of different cardiovascular or respiratory diseases. In regards to the cardiovascular system, clubbing could be a sign of chronic hypoxia, infective endocarditis, and some congenital heart defects.
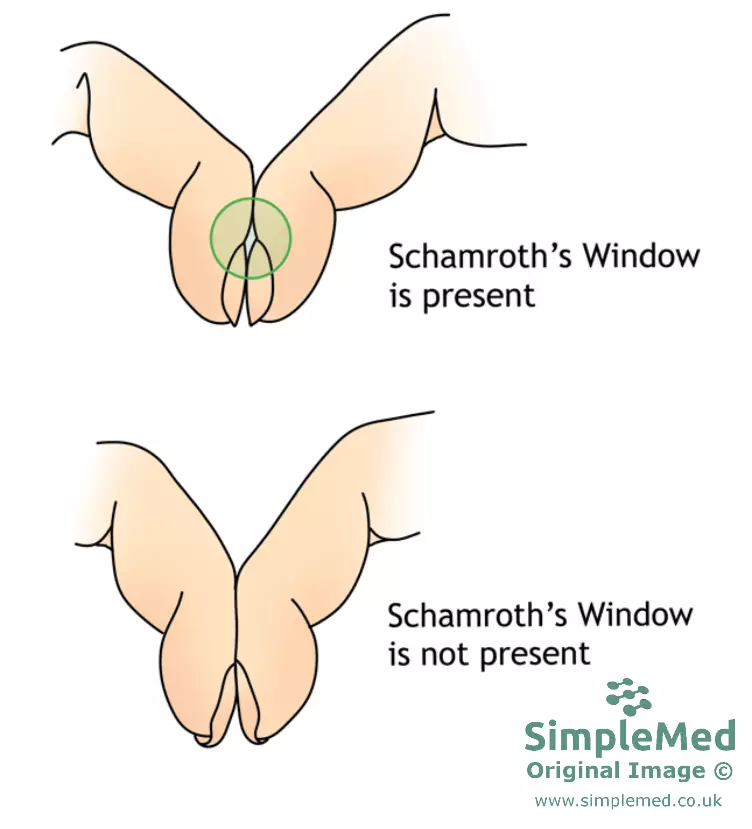
Image - The difference in the Schamroth’s window test. The bottom image shows a patient with clubbing as there is no gap between the fingernails
SimpleMed original by Bethany Turner
Capillary refill time is a test used to assess the perfusion of the fingers. This test is carried out by pressing on one of the patient’s fingers for five seconds. Once the finger is released, it should turn from a pale white, back to its normal colour in less than two seconds. If it takes longer than two seconds to reperfuse, then this may be a sign of shock, impaired peripheral perfusion or dehydration.
Pulses
When assessing radial pulse you should look out for its rate and rhythm. Normal pulse rate is around 60-100 bpm.
Aortic regurgitation will also produce a positive result in the collapsing pulse test, in which you will feel a ‘tapping’ sensation in the pulse when the arm is raised quickly above the head, as doing so increases preload (due to more blood returning from the arm to the heart) and therefore increases cardiac output, having a palpable effect. Before performing this test, it is important to ask if the patient is experiencing any shoulder pain.
To asses the character of the pulse use either the brachial or carotid artery. The pulse's character can be either normal, bounding or thready.
A bounding pulse, when the pulse feels very strong and throbbing, can be caused by conditions such as bradycardia or aortic regurgitation. In aortic regurgitation, the pulse pressure is widened leading to a stronger feeling pulse. This is as the ventricle is pumping normally in systole and achieving a good systolic pressure, however in diastole the blood in the aorta runs back into the ventricle through the incompetent valve causing the diastolic pressure to be low. This results in a large difference between systolic and diastolic pressure, and the pressure changes can be felt as a bounding pulse. Bradycardia allows a longer time for the diastolic run off to occur, again widening pulse pressure again increasing the strength of the pulse.
A thready pulse, one that feels very weak, is seen in conditions when there is a low mean arterial blood pressure, such as in left ventricular failure or hypovolaemia.
Radio-radial delay is when the two radial pulses are not in sync with each other. This is caused by coarctation of the aorta (narrowing) between the branches of the brachiocephalic and left subclavian arteries. This means that although blood that is pumped out of the heart can easily pass through the brachiocephalic trunk, blood travelling through the left subclavian must pass through the narrowed section. This causes a delay in the blood flow to the left arm. Therefore, the radial pulse in the left arm will be felt slightly after the pulse in the right arm. If the coarctation is after the left subclavian artery, the radial pulses will be felt to be in sync, but the femoral pulse will be delayed – called radio-femoral delay.
Radial-radial delay may also be caused by an aortic dissection.
Brachial blood pressure should be monitored to assess for hypo- or hypertension by measuring blood pressure in the upper arm. Read more about hypertension here.
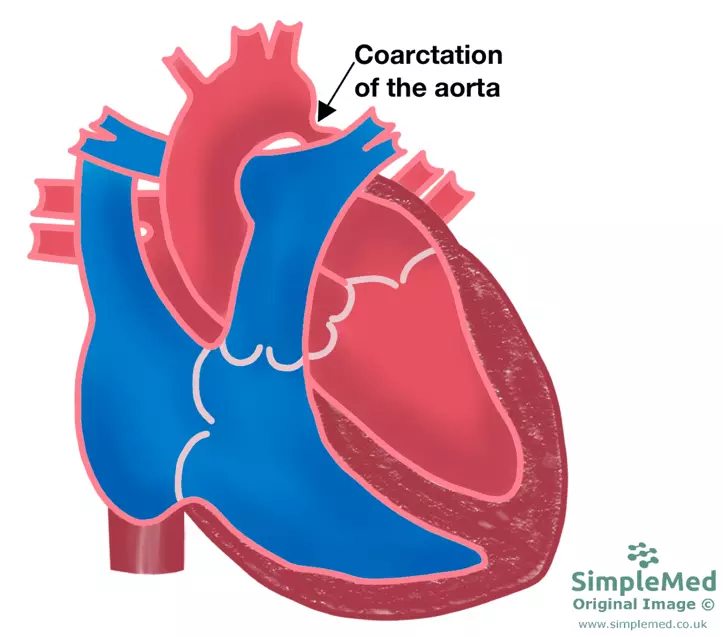
Image - Coarctation of the aorta. The coarctation is after the three vessels, so the patient will have radial-femoral delay on examination
SimpleMed original by Bethany Turner
Facial Examination
On general inspection of the face, assess for mitral facies. This is a sign in which the patient has rosy cheeks but a bluish tinge to the rest of the face. It occurs in patients with mitral stenosis with associated reduced cardiac output.
Patients with hyperlipidaemia may have abnormalities in or around the eyes due to deposition of lipid. Corneal arcus occurs when lipid is deposited in the iris and is seen as a pale ring around the outside of the iris. Xanthelasma is similar to tendinous xanthoma in that it is seen when lipid is deposited in the skin around the eyes. It is seen as small raised yellow patches of skin.
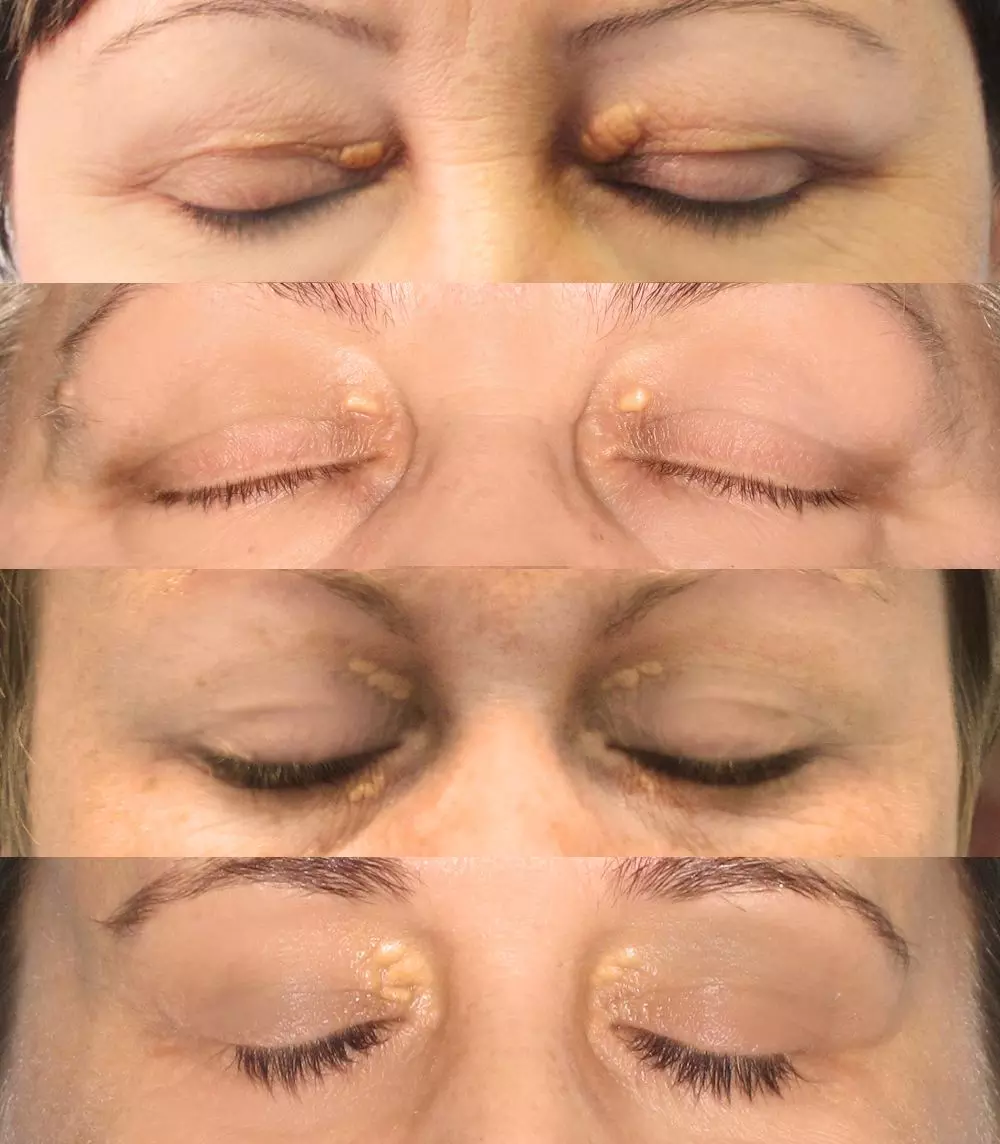
Image - Xanthelasma. There are visible raised yellow patches of skin around the eyes
Creative commons source by Oleg Tymofii [CC BY-SA 4.0 (https://creativecommons.org/licenses/by-sa/4.0)]
When a patient pulls down their lower eyelids, look for paleness of the conjunctiva which could indicate anaemia.
When assessing the mouth, central cyanosis may be seen, which is a blueish tinge to the mucous membranes. This indicates low oxygen saturation in the blood circulating around the body. Cardiovascular causes include cyanotic congenital heart defects, and pulmonary embolism. Be sure not to confuse with peripheral cyanosis which is caused by issues with circulation rather than oxygenation of blood.
Anaemia from iron or vitamin B12 deficiency can cause glossitis or angular stomatitis. Glossitis is seen as an, enlarged, glossy, smooth tongue. Angular stomatitis is seen as dry erythematous changes to the skin at the corners of the mouth.
It is important to assess the state of dentition in a cardiovascular exam, as poor dental hygiene is a common root of entry for the bacteria that can cause infective endocarditis.
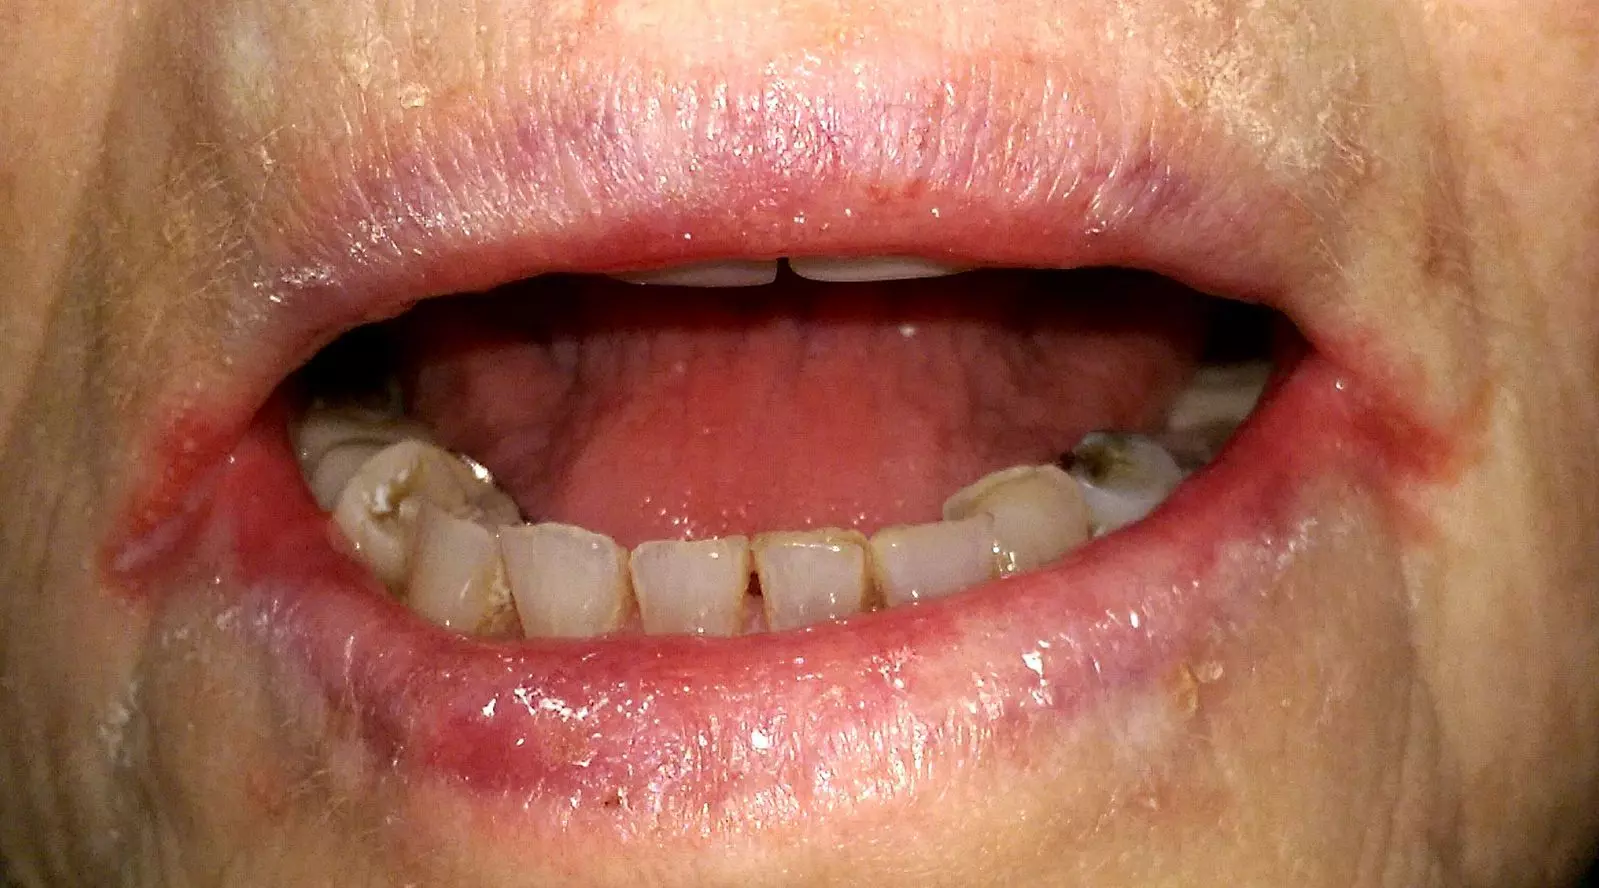
Image - Angular stomatitis, which is a sign of anaemia
Creative commons source by Matthew Ferguson 57 [CC BY-SA 4.0 (https://creativecommons.org/licenses/by-sa/4.0)]
Neck Examination
Check the carotid pulses by placing your fingers at the top of the neck under the jaw to assess the character of the pulse. It is important not to check the two carotid pulses at the same time as there is a risk of occluding the arterial supply, or causing the patient to faint due to carotid sinus massage.
Ask the patient to hold their breath and, using the bell of your stethoscope, listen over the carotid arteries for any carotid bruits (abnormal noises). This could indicate narrowing of the carotid arteries which is a risk factor for stroke. A bruit in the neck may also be due to a murmur from aortic stenosis that radiates to the neck. A good tip is to hold your breath along with the patient. This ensures that the patient does not have to hold their breath for longer than is necessary.
Assessing the jugular venous pressure (JVP) can give an indication about the pressure in the venous circulation. Pressure can be raised in cardiac conditions such as fluid overload or right sided heart failure. To perform the test, make sure the patient is sitting at 45o with their head turned to the left. Identify the internal jugular vein which usually lies between the two heads of the sternocleidomastoid muscle as it inserts into the sternum and clavicle.If a pulse is visible, measure the height between the sternal angle and the border of the pulsation to assess whether the pressure is raised.
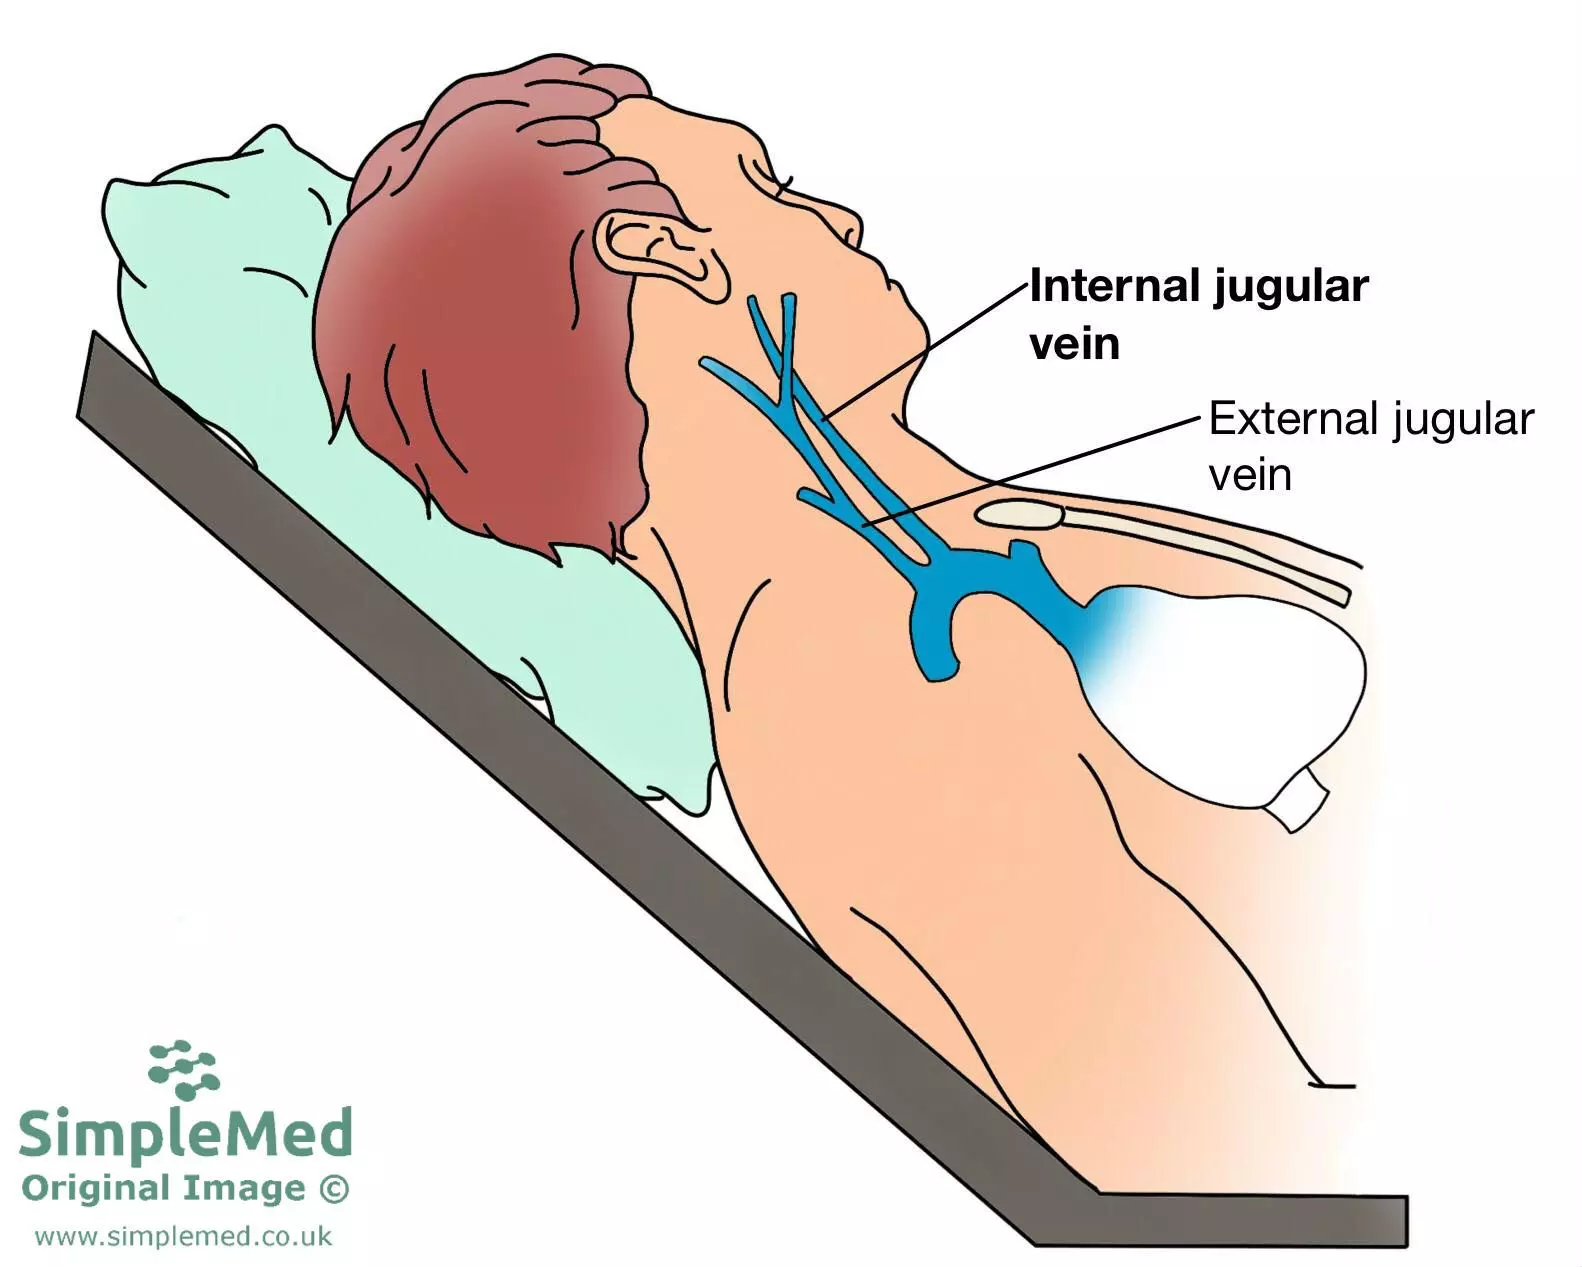
Image - How to measure the JVP. Angle the patient at 45o and ask them to turn their head away from you and look for a pulsation in their neck. A pulsation high up the neck suggests pathology such as fluid overload or heart failure
SimpleMed original by Bethany Turner
Chest Inspection
Before examining the chest, it is important to allow time for a general inspection. Look for abnormalities such as pectus excavatum, when the sternum is ‘sunken’ in the chest wall, giving a caved-in appearance, or pectus carinatum, also called ‘pigeon chest’ and is when the sternum is ‘pushed out’ of the chest wall giving a pointed appearance. These congenital abnormalities can affect breathing.
Look for any signs of trauma, any asymmetry, any surgical scars, indwelling pacemakers and any visible pulsation.
Chest Palpation
Before palpating the chest make sure the patient isn’t in any pain.
Place the heel of the hand over the left edge of the sternum and check for a parasternal heave. This can be felt as a pushing sensation on your hand and indicates right ventricular hypertrophy.
Feel in the left fifth intercostal space in the mid-clavicular line for the apex beat. If it is displaced to the left, this could indicate left ventricular hypertrophy.
Place your hand over each valve area and feel for any heaves or thrills (felt like vibrations under the hand). This indicates turbulent flow around the valves due to regurgitation or stenosis.
Valve areas:
- Aortic – right sternal edge, second intercostal space
- Pulmonary – left sternal edge, second intercostal space
- Tricuspid – left sternal edge, fifth intercostal space
- Mitral – mid-clavicaular line, fifth intercostal space
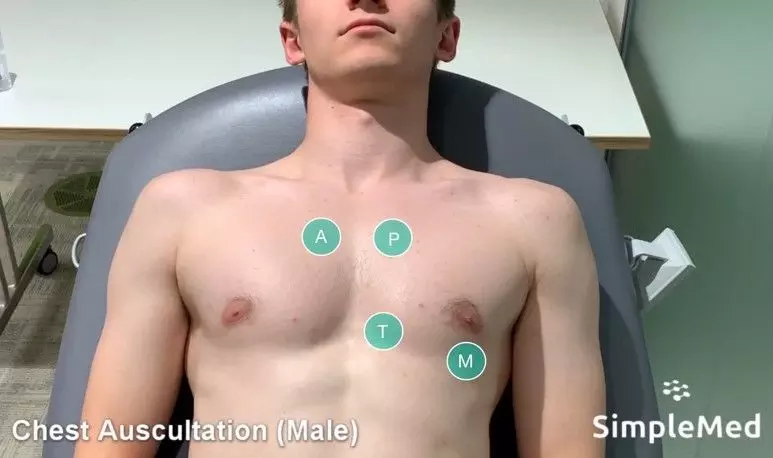
Image - The four valve areas where the stethoscope should be placed to listen to the valves.
A: Atrial, P: Pulmonary, T: Tricuspid, M: Mitral
SimpleMed original
Chest Auscultation
Listen with a stethoscope over the valve areas for any murmurs which could indicate turbulent flow caused by stenosis or regurgitation of the valves.
Aortic valve stenosis murmurs can radiate to the neck so listen upwards towards the neck to check for this.
There are two common accentuation manoeuvres which can be done to hear certain murmurs more clearly:
- Sit the patient upright and listen to the aortic area when the patient exhales to listen for aortic regurgitation.
- Roll the patient onto their left side and listen to the mitral area when the patient exhales to listen for mitral stenosis or regurgitation. Move the stethoscope towards the axilla to listen for radiation of mitral valve murmurs.
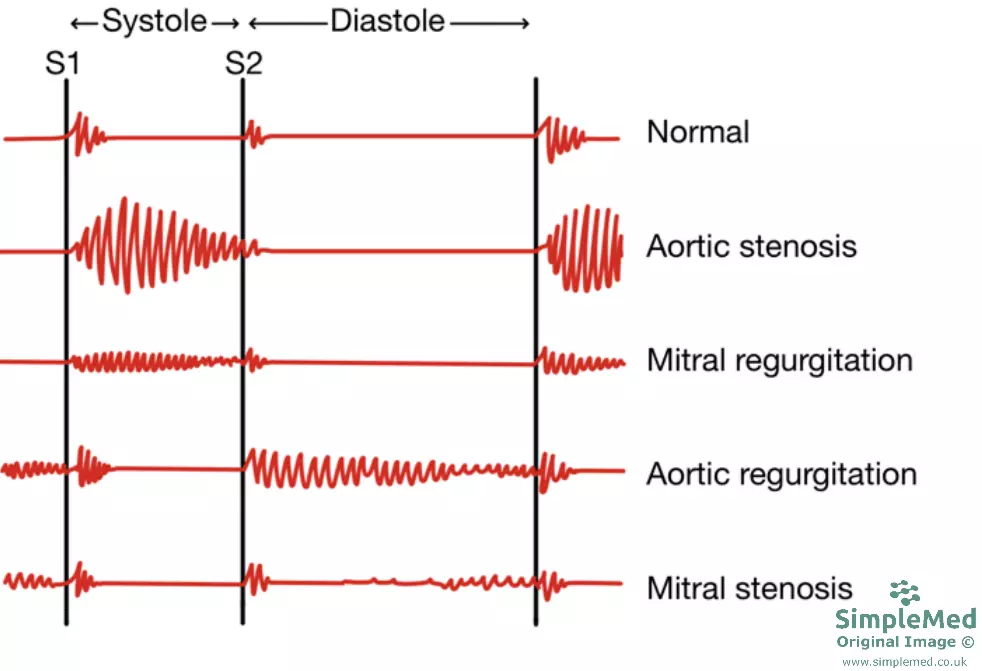
Image - The different sounds that can be heard when auscultating heart valves
SimpleMed original by Bethany Turner
Back Examination
Auscultate the lung bases to listen for any crackles which could indicate pulmonary oedema due to left sided heart failure.
Press firmly on the skin in the sacral area for a few seconds to check for any sacral oedema which could suggest fluid overload or heart failure.
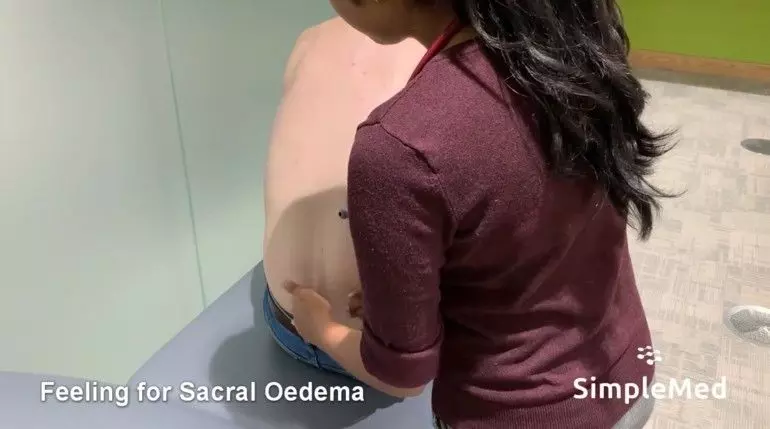
Image - How to check for sacral oedema
SimpleMed original
Examination of the Feet
Press firmly on the skin around the ankles for a few seconds to check for any pitting oedema which could suggest fluid overload or heart failure.
Check the pedal pulses in both feet. To feel for the posterior tibial pulse, press your fingers behind the medial malleolus. To feel for the dorsalis pedis pulse, press your fingers lateral to the extensor hallucis longus tendon. Absence of these pulses may indicate peripheral vascular disease.
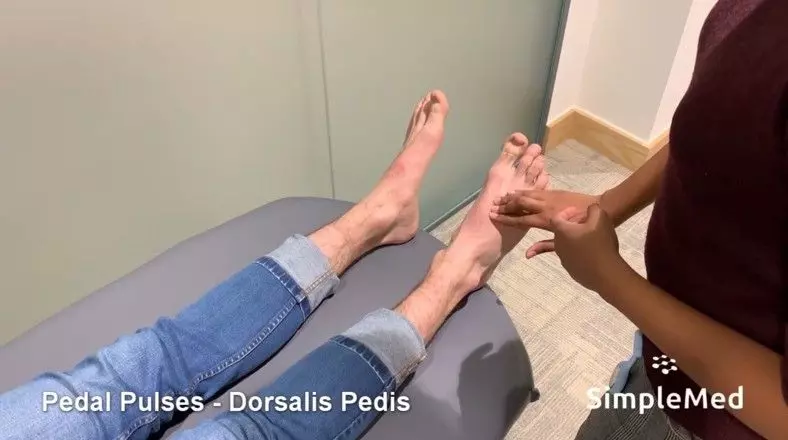
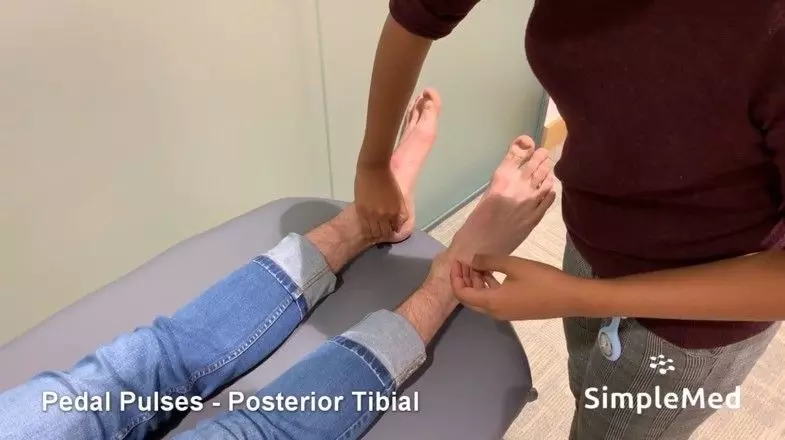
Image - How to check the pedal pulses. The dorsalis pedis pulse is felt on the top of the feet lateral to the extensor hallucis longus tendon. The posterior tibial pulse is felt behind the medial malleolus
Both images are SimpleMed originals
Completing the Examination
Thank the patient and wash your hands.
Summarise your findings.
To complete the examination, suggest performing a 12-lead ECG to look for any arrhythmias, perform an examination of the peripheral vasculature, urine dip to check for proteinuria or haematuria, and order relevant blood tests to look for cardiac enzyme markers and BNP.
Edited by: Ben Appleby
Reviewed by: Thomas Burnell
- 10748

